Sometimes, I need to create a laboratory with virtual machines or containers that I can set up easily for testing various technologies. I used to use UML, but this solution doesn’t address my requirements.
In this article, we look at how to set up a laboratory, with systemd spawn for making containers.
Making our first container
To make our first container, we must use systemd, which allows us to manage services. To do so, we must use systemd-nspawn.
First, we create our repository, which contains all of the files for our new system:
$ mkdir ~/lab-test/test-arch
Then, we can create our system. For the ArchLinux users, you must install the package arch-install-scripts for using pacstrap, and with that, you can install your distribution:
$ pacstrap -c -d ~/lab-test/test-arch/ base
For Debian users, you must install debootstrap:
$ mkdir ~/lab-test/test-debian
$ debootstrap --arch=amd64 unstable ~/lab-test/test-debian/
Now that we have installed our system, we can start using it:
$ sudo systemd-nspawn -D ~/lab-test/test-arch
We are in our container, and we have one shell. First of all, you must change the root's password. After that, if you want to manage one service with systemctl, you will get the following error:
# systemctl status systemd-networkd
System has not been booted with systemd as init system (PID 1). Can't operate.
Failed to connect to bus: Host is down
As you see, the error is very clear: systemd isn’t the first process, and we can check that:
# cat /proc/1/status | grep -i Name
Name:    bash
To fix this issue, we must boot up in our container. Exit your container, and boot up with this command:
$ sudo systemd-nspawn -bD ~/lab-test/test-arch
After the booting up sequence, you can log with the root user account, with the new password; then, we check if we can use systemd:
# systemctl status systemd-networkd
* systemd-networkd.service - Network Service
     Loaded: loaded (/usr/lib/systemd/system/systemd-networkd.service; disabled; vendor preset: enabled)
     Active: inactive (dead)
       Docs: man:systemd-networkd.service(8)
If you experience an issue when logging in within your container, you must delete these files
/etc/securettyand/usr/share/factory/etc/securettywithin your container:
Managing your containers
SystemD uses the package systemd-machined to manage the virtual machines and containers, as follows:
$ machinectl
MACHINE   CLASS     SERVICE        OS   VERSION ADDRESSES
test-arch container systemd-nspawn arch -       -

1 machines listed.
When a container is initiated, the file /run/systemd/machines/ is created in the repository :
# This is private data. Do not parse.
NAME=test-arch
SCOPE=machine-test\\x2darch.scope
SERVICE=systemd-nspawn
ROOT=/home/geoffrey/lab-test/test-arch
ID=b4227f1d22324c759234b6810f8944e1
LEADER=31643
CLASS=container
REALTIME=1587988574107599
MONOTONIC=11122121091
NETIF=6
Manage your network
To have network access from our container, we must connect it to a bridge. To do that, we use the package bridge-utils and we create one bridge and put in an IP address:
# brctl addbr br0
# ip addr add 192.168.2.1/24 dev br0
# ip link set br0 up
With the command systemd-spawn, we can add some parameters to connect our container to a bridge:
# systemd-nspawn -bD ~/lab-test/test-arch/ --private-network --network-veth --network-bridge=br0
In our container, we can add an IP address and we will use nginx:
# ip addr add 192.168.2.2/24 dev host0
# ip link set host0 up
# systemctl start nginx && systemctl status nginx
* nginx.service - A high performance web server and a reverse proxy server
     Loaded: loaded (/usr/lib/systemd/system/nginx.service; disabled; vendor preset: disabled)
     Active: active (running) since Mon 2020-04-27 17:46:46 CEST; 7ms ago
    Process: 40 ExecStart=/usr/bin/nginx -g pid /run/nginx.pid; error_log stderr; (code=exited, status=0/SUCCESS)
   Main PID: 41 (nginx)
     CGroup: /system.slice/nginx.service
             |-41 nginx: master process /usr/bin/nginx -g pid /run/nginx.pid; error_log stderr;
             `-42 nginx: worker process
[...]
When Nginx has started, we make a request to get an HTML page:
$ curl 192.168.2.2
<!DOCTYPE html>
<html>
<head>
<title>Welcome to nginx!</title>
<style>
    body {
        width: 35em;
        margin: 0 auto;
        font-family: Tahoma, Verdana, Arial, sans-serif;
    }
</style>
</head>
<body>
<h1>Welcome to nginx!</h1>
<p>If you see this page, the nginx web server is successfully installed and
working. Further configuration is required.</p>

<p>For online documentation and support please refer to
<a href="http://nginx.org/">nginx.org</a>.<br/>
Commercial support is available at
<a href="http://nginx.com/">nginx.com</a>.</p>

<p><em>Thank you for using nginx.</em></p>
</body>
</html>
Laboratory
Now we look at how to set up a laboratory. In the figure below, you can see the its architecture:
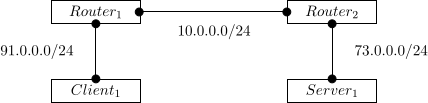 Figure XXX: Architecture of our new laboratory
Our server will host the Nginx service. The client will just be an HTTP client. To manage our routers and exchange their routing tables, we will use Bird.
The problem
As you see in the figure above, our routers needed two interfaces: one for the client and one for connecting with the router pair, but it wasn’t possible to make two different veths with the parameters --network-veth and --network-bridge.
So, to fix this issue, we must manually create one veth and connect to our bridge:
$ sudo ip link add ve-rt1 type veth peer name ve-rt2
$ sudo brctl addif br1 ve-rt2
$ brctl show
bridge name    bridge id        STP enabled    interfaces
br0        8000.86b54a73aaef    no
br1        8000.e6b16988d1b0    no        ve-rt2
Then, we will start our container:
$ sudo systemd-nspawn -D router1/ --private-network --network-veth --network-bridge=br0 --network-interface=ve-rt1
Our laboratory
We can now start to set up our laboratory. First at all, we create our routers with the Bird application:
$ mkdir ~/lab-test/{router1,router2}
$ pacstrap -c -d ~/lab-test/router1 base
$ pacstrap -c -d ~/lab-test/router2 base
Then, we start router1 and configure it:
router1# echo 1 > /proc/sys/net/ipv4/ip_forward
router1# ip addr add 91.0.0.1/24 dev host0 && ip link set host0 up
router1# ip addr add 10.0.0.1/24 dev ve-rt1 && ip link set ve-rt1 up
router1# cat /etc/bird.conf
[...]
protocol static static4 {
    ipv4;

    route 73.0.0.0/24 via 10.0.0.2;
}
[...]
We apply the same configuration for router2:
router2# echo 1 > /proc/sys/net/ipv4/ip_forward
router2# ip addr add 91.0.0.2/24 dev host0 && ip link set host0 up
router2# ip addr add 10.0.0.2/24 dev ve-rt2 && ip link set ve-rt2 up
router2# cat /etc/bird.conf
[...]
protocol static static4 {
    ipv4;

    route 91.0.0.0/24 via 10.0.0.1;
}
[...]
Then, we can start our container for the Nginx server and configure it:
server1# ip addr add 73.0.0.2/24 dev host0 && ip link set host0 up
server1# ip route add default via 73.0.0.1
server1# systemctl status nginx
* nginx.service - A high performance web server and a reverse proxy server
     Loaded: loaded (/usr/lib/systemd/system/nginx.service; disabled; vendor preset: disabled)
     Active: active (running) since Thu 2020-04-30 14:49:11 CEST; 15min ago
    Process: 60 ExecStart=/usr/bin/nginx -g pid /run/nginx.pid; error_log stderr; (code=exited, status=0/SUCCESS)
   Main PID: 61 (nginx)
[...]
Then, we configure our client:
client1# ip addr add 91.0.0.2/24 dev host0 && ip link set host0 up
client1# ip route add default via 91.0.0.1
Now, we boot our containers, and we could check if our routers can forward all packets:
router1# ping -c 1 73.0.0.1
PING 73.0.0.1 (73.0.0.1) 56(84) bytes of data.
64 bytes from 73.0.0.1: icmp_seq=1 ttl=64 time=0.098 ms

--- 73.0.0.1 ping statistics ---
1 packets transmitted, 1 received, 0% packet loss, time 0ms
rtt min/avg/max/mdev = 0.098/0.098/0.098/0.000 ms

router1# ping -c 1 73.0.0.2
PING 73.0.0.2 (73.0.0.2) 56(84) bytes of data.
64 bytes from 73.0.0.2: icmp_seq=1 ttl=63 time=0.232 ms

--- 73.0.0.2 ping statistics ---
1 packets transmitted, 1 received, 0% packet loss, time 0ms
rtt min/avg/max/mdev = 0.232/0.232/0.232/0.000 ms

client1# ping -c 1 73.0.0.2
PING 73.0.0.2 (73.0.0.2) 56(84) bytes of data.
64 bytes from 73.0.0.2: icmp_seq=1 ttl=62 time=0.159 ms

--- 73.0.0.2 ping statistics ---
1 packets transmitted, 1 received, 0% packet loss, time 0ms
rtt min/avg/max/mdev = 0.159/0.159/0.159/0.000 ms
And finally, we can test a request sent by our client to the server:
client1# curl -v 73.0.0.2
*   Trying 73.0.0.2:80...
* Connected to 73.0.0.2 (73.0.0.2) port 80 (#0)
> GET / HTTP/1.1
> Host: 73.0.0.2
> User-Agent: curl/7.69.1
> Accept: */*
>
* Mark bundle as not supporting multiuse
< HTTP/1.1 200 OK
< Server: nginx/1.18.0
[...]
Script
This is the script I used to set up my laboratory:
#!/bin/sh

create_bridge() {
    # Create if not exist
    if [ ! -d /sys/class/net/$1 ]; then
      sudo brctl addbr $1
      sudo ip link set $1 up
    fi
}

create_veth() {
    if [ ! -d /sys/class/net/$1 ]; then
        sudo ip link add $1 type veth peer name $2
        sudo ip link set $1 up && sudo ip link set $2 up
    fi
    if [ ! -d /sys/class/net/$3/brif/$2 ]
    then
        sudo brctl addif $3 $2
    fi
}

vm1=clt1
vm2=srv1
rt1=rt1
rt2=rt2

# Create bridges
bridge1=br0
bridge2=br1
bridge3=br2
create_bridge $bridge1
create_bridge $bridge2
create_bridge $bridge3

# Create veth
if1=ve-$rt1
if2=ve-$rt2
create_veth $if1 ve-to-$rt2 $bridge2
create_veth $if2 ve-to-$rt1 $bridge2

# Start containers
case $1 in
  clt1)
    sudo systemd-nspawn -bD ~/lab-test/clt1/ \
      --private-network --network-veth --network-bridge=$bridge1
    ;;
  srv1)
    sudo systemd-nspawn -bD ~/lab-test/srv1/ \
      --private-network --network-veth --network-bridge=$bridge3
    ;;
  rt1)
    sudo systemd-nspawn -bD ~/lab-test/router1/ \
      --private-network --network-veth --network-bridge=$bridge1 \
      --network-interface=$if1
    ;;
  rt2)
    sudo systemd-nspawn -bD ~/lab-test/router2/ \
      --private-network --network-veth --network-bridge=$bridge3 \
      --network-interface=$if2
    ;;
esac
The script takes one argument, the name of the container.
To conclude
I admit, I didn’t succeed at booting the container in the background, and it’s complicated to set up a laboratory, because, for each container, I need to open a new terminal. But, I found the systemd-nspawn solution very interesting, and it’s installed by default in the linux system, if you used systemd.